
41 Amazing Cleaning Tips That Will Change Your Life
Looking for ways to make cleaning faster and easier? Here are 41 genius cleaning tips that do just that.
Housework is one of those never-ending battles you can’t seem to win. You barely finish cleaning a room before you notice the dust settling again.
The ‘dump zone’ by the front door piles up faster than you can put things away, and you haven’t seen the laundry room floor in months.
You’re exhausted, frustrated, and at your wit’s end. It’s time to find a faster, better way.
What is the Fastest Way to Clean a House?
The fastest way to clean a house is to do a speed clean of the visible surfaces. It works great in a pinch but it isn’t a permanent solution.
Cleaning Tips that Make it All Easier
The best way to make cleaning faster is to follow a regular cleaning routine and use these tips and hacks to make specific tasks easier.

This post may contain affiliate links. Please see my disclosure policy for details.
1. Keep Cleaning Kits Handy
Cleaning kits can be a total game-changer for keeping your home clean and they’re a lazy girl’s favorite cleaning hack.
Keep a small kit with basic cleaning supplies in each of the central areas of your home.
You don’t need your full cleaning arsenal in every room. Your cleaning kit can be as simple as a pack of disinfectant wipes and a microfiber cloth to handle small messes as they occur.
These little kits are so handy you might even catch your spouse or children cleaning just because the supplies are right there. They also make it really easy when you need to speed clean because friends are ‘dropping by’.
I keep cleaning kits in my kitchen and both bathrooms. Mine all contain a pack of disinfectant wipes, a bottle of hydrogen peroxide with a spray top, and a few microfiber cloths. All of my other cleaning supplies and backstock are in my laundry room
2. Remove Food Stains from Plastic with Hydrogen Peroxide
Did the spaghetti sauce turn the inside of your plastic food container an unappetizing color of orange?
Spray the stained plastic with hydrogen peroxide and let it sit in the sun for the day. The peroxide and sunlight will ‘bleach’ the stains out without any harmful chemicals.
You can do this with your plastic cutting boards too. You might be surprised at all the things you can clean with hydrogen peroxide.
3. Keep Your Drains Clear with Pantry Items
Slow drains are so annoying and can cause big issues. Especially if you have a house full of people when they aren’t draining properly.
Even if you keep food, grease, and other materials out of the drains as much as possible, they can still accumulate buildup from the stuff that sneaks through.
If you notice your sink is draining a little slower, grab some hydrogen peroxide and baking soda.
Make a slurry, pour it down the drain, and let it sit for 10 minutes.
After 10 minutes, flush with hot water for 3-5 minutes and the sink should start draining faster.
I do this for all of my drains during my spring cleaning routine.
Pro Tip: Always run cold water when using your garbage disposal. It’ll help solidify any grease in the food and flush it down the drain so it doesn’t coat the insides of your plumbing.
GET YOUR CLEANING DONE DURING THE WEEK!
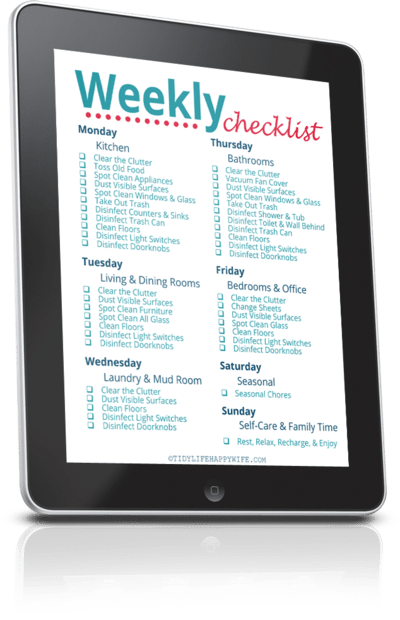
Join thousands of VIPs for cleaning, decluttering, and organizing tips sent straight to your inbox. As a welcome gift, we’ll send you this FREE printable Weekly Cleaning Checklist that lists exactly what to deep clean in every room of your home.
4. Prevent Spots with Wax Paper
Don’t you hate seeing water spots on a faucet after you just cleaned it?
When you finish cleaning and drying the fixtures, rub them down with wax paper and buff them to a shine with a microfiber cloth. The wax in the paper coats and protects the fixtures from water droplets.
Car wax will give the same effect.
5. Use Rubber to Remove Pet Hair
Pet hair is a cleaning nightmare, especially cat hair. That stuff gets everywhere and clings on for dear life.
Wear non-slip rubber gloves or use a rubber squeegee to remove pet hair from furniture and carpet. The friction from the rubber pulls the pet hair right off of the fabric.
I have 2 cats and can tell you this cleaning tip is a lifesaver. There is no vacuum on this planet that can remove pet hair from furniture and carpet as quickly and easily as a good rubber squeegee.
Try it, you’ll be amazed. See the rest of my tips for keeping your house clean with cats.
6. Remove Oil-Based Fabric Stains with Dawn and Baking Soda
Have you ever grabbed your favorite black blouse and noticed a dark spot on the front, then you remember that sneaky piece of shrimp scampi that didn’t quite make it into your mouth.
That butter-soaked right in and took up residence. Now what??
Squirt a drop of Dawn on the stain, rub it in, then sprinkle with 1 teaspoon of baking soda. Scrub with a nail brush, let sit for 15 minutes, then rinse and launder like normal.
Pro Tip: Don’t scrub too vigorously or use so much baking soda that you damage the fabric.
7. Clean As You Go
Clean up after yourself when you finish what you’re doing. Put away whatever you took out, and clean off anything left behind.
Seriously, you’re right there, so clean up whatever mess you might have made. It’s not going to be any quicker or easier to clean up later and doing it now will help you keep your home clean all the time.
Think dried egg yolk on a breakfast plate, or dried toothpaste on your porcelain sink. You can take 3 seconds to wipe it off with a handy microfiber cloth now, or you can take 5 minutes to spray it, let it soak, then scrub it clean once it’s dried up later.
Cleaning it up now will be quicker and easier. I promise.
8. Pick Up Broken Glass with a Slice of Bread
Broken glass is difficult to clean up. Especially when it shatters and flies everywhere.
Do your best to pick up and discard the large pieces. Sweep larger shards into a dustpan and discard. Lightly press a slice of bread over the broken glass to pick up any remaining shards.
A moist and dense bread will work best.
9. Use White Vinegar to Remove Hard Water Build Up
Hard water stains are a scaly buildup of magnesium, calcium, and other minerals. The acetic acid in white vinegar attacks the minerals and loosens the scale buildup making it much easier to get off.
It works particularly well with stains and buildup on faucets, showerheads, toilets, sinks, and shower doors.
You do need to let the vinegar sit for a while to get the full benefit. For best results, keep the surface saturated with white vinegar for several hours.
I soak my shower head by taping a baggie full of vinegar over it. For surfaces like the tub or shower door, I just spray every 15 minutes for an hour or so, then scrub away.
Caution: The acetic acid in white vinegar can cause damage and should never be used on certain surfaces including soft rubber seals and natural stone.
10. Delegate
Sounds great, huh?! Just get somebody else to do it, but seriously, delegate some of those cleaning tasks.
If you don’t live alone, you aren’t making all of the messes by yourself. Delegate specific cleaning tasks to other members of the family.
If you’ve already tried that without much success, have a family meeting. Create a list of tasks that need to be done on a regular basis, then have each family member select which ones they want to do.
Once they’ve selected their tasks, give them a written list so they know exactly what to do. You can also try some of my tricks for getting help without nagging.
You might get stuck with all the nasty jobs everybody hates, but you’re currently doing it all anyway, so every little task will help.
11. Use a Lint Roller for Dusting Fabric Surfaces
Lint rollers are great for getting the hair and lint off of your clothes, but they also come in handy for dusting other things.
One of the most helpful cleaning hacks I’ve used is to use a lint roller to dust lampshades. It pulls the dust bunnies right off of the textured fabric and does a great job around the rolled edges.
It also works really well on curtains and the bottom edges of furniture.
I’ve even used my lint roller to dust paintings, just don’t press so hard that the roller tape sticks to the surface of the painting!
12. Keep Baseboards Clean with a Broom and Microfiber Cloth
Once baseboards get really dirty, the only way to get them clean is with a rag, soap and water, and some back-breaking elbow grease.
To avoid all of that, wrap a microfiber cloth around the fibers of your broom and ‘dust’ your baseboards a couple of times a year.
I do mine in April with my spring cleaning and in October when I’m getting my home ready for the holidays.
13. Clean From Top to Bottom
This cleaning trick can save you a ton of time and frustration.
Always start at the top and work your way down. This way you won’t push dust, dirt, and cleaner onto a surface you already cleaned.
Imagine how frustrated you’d be if you wiped off your counters, then dusted the tops of your cabinets
14. Disinfect Your Sponge in the Dishwasher
Sponges are a hotbed of bacteria because they’re designed to soak up and hold onto moisture. Even if you ring them out really well, they’ll start to smell bad.
If you insist on using a sponge, spray it with hydrogen peroxide and toss it on the top rack of the dishwasher every time to run a load.
The peroxide and extremely hot water will kill the bacteria and preserve the life of your sponge for a while.
GET YOUR CLEANING DONE DURING THE WEEK!
Join thousands of VIPs for cleaning, decluttering, and organizing tips sent straight to your inbox. As a welcome gift, we’ll send you this FREE printable Weekly Cleaning Checklist that lists exactly what to deep clean in every room of your home.
15. Use Your Vacuum Upholstery Attachment to Dust Your Blinds
If you have blinds in your home, have I got a cleaning tip for you.
The dusting attachment on your vacuum is the best way to dust your blinds. It sucks up all of the dust while removing it from your blinds.
I know you have one of those 3-pronged dusting gadgets, but it’s a pain to get just perfectly between the slats, and you have to keep moving it around the cords. In the meantime, you’re pushing little piles of dust into the area around the cords.
Try your vacuum upholstery attachment, you’re going to love it.
Close your blinds tightly (doesn’t matter which way) and use the upholstery attachment working top to bottom and side to side to remove the dust. Flip the blinds the other way and repeat.
It’s quick, easy, and actually picks up all of the dust instead of pushing it up around the cords.
16. Follow a Regular Cleaning Routine
Create a regular cleaning routine that works for your family.
A scheduled cleaning routine will help ensure things get cleaned on a regular basis so little messes do go unnoticed and turn into bigger messes.
The trick to creating a cleaning routine that works is to decide how often things need to be cleaned and how clean they need to be.
If you have a big family, you’re probably going to need to do a load of laundry every day to stay on top of it all. In my home, it’s just my husband and me, so I get away with doing 1 load of laundry every 3 or 4 days.
If you have a spare room or dedicated office that doesn’t get used very often, you might be able to get away with dusting and vacuuming every 3 or 4 weeks, but bedrooms that are used daily will need more attention.
Pro Tip: Post the cleaning schedule where everybody can see it. It sometimes helps spouses and children to have a visual reminder.
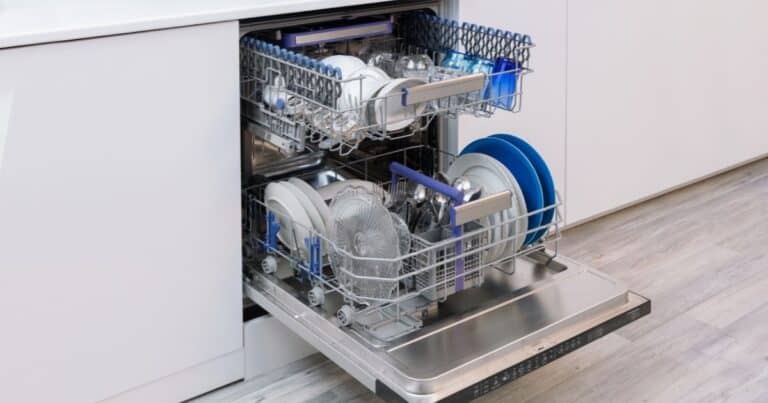
17. Clean Vent Covers in the Dishwasher
Save time and energy by running your vent covers (including heater, bathroom exhaust, and stove exhaust covers) through the dishwasher on the top rack.
They’ll come out sparkling clean with no effort on your part.
18. Use Toothpaste to Clean Crayon Marks
Everybody loves a great piece of child artwork, except when the canvas was a wall, cabinet, or kitchen appliance.
Now what? Take a picture to preserve the memory of the artwork and grab a tube of toothpaste. I recommend white toothpaste and have never tried the gel type.
Squeeze the toothpaste onto a damp rag and wipe the crayon marks in a circular motion. Periodically wipe the area with a clean, damp cloth to assess your progress.
The toothpaste is abrasive enough to remove the greasy crayon but gentle enough that it doesn’t damage those surfaces.
19. Have a Nightly Family Cleaning Blitz
Clutter can make a house messy almost as quickly as a muddy dog! Well, that might be a bit of an exaggeration, but I’m using it anyway.
Before everybody sits down and gets comfortable for the night, assign each person a room, or rooms, to do a quick cleaning blitz in. All they need to do is put away misplaced items and wipe up messes on flat surfaces.
You’ll be shocked how much difference this little blitz can make.
20. Clean Lighting Covers in the Dishwasher
Chandelier, sconce, and other lighting fixture covers and be intricate and difficult to clean.
You can soak and scrub them in the sink, but some aren’t so easy to clean that way. If yours aren’t, use the dishwasher
Remove fixture covers and wash them on the top rack of your dishwasher. The water jets will get into all of the small, detailed areas much better than wiping down or washing in the sink.
21. Battle Dust and Dirt with a NO Shoe Policy
Shoes can be blamed for a lot of the dust and dirt (not to mention the rest of the nastiness) that ends up in your home.
Everybody walks all over the place all day long, then brings all of that unknown dirtiness right into your home on the bottoms of their shoes.
Try implementing a No Shoe Policy to keep some of it out.
Get welcome mats for both the indoor and outdoor sides of your door and set up a shoe basket or storage rack in a convenient spot nearby.
If you live in a wet climate, you might add a drip mat or shoe tray to corral the water.
Keep in mind that some people have medical conditions that make it dangerous to walk around with no shoes. I suggest being flexible or providing a simple shoe cover so they can keep their shoes on and you can keep your floors clean.
22. Clean Vinyl Flooring Scuffs & Stains with Alcohol
Vinyl flooring is prone to scuffs and stains. The Magic Eraser and abrasive cleaners can ruin and discolor the vinyl.
To get stains and scuff marks off of vinyl flooring, dip a microfiber cloth in rubbing alcohol and rub the scuff marks away. Out of rubbing alcohol? Use some straight Vodka instead
23. Use Hydrogen Peroxide to Remove Blood Stains
Hydrogen peroxide has many cleaning uses, but removing protein-based stains is its superpower.
Hydrogen peroxide is an oxidizer, so it soaks in and breaks down the components of the bloodstain making it easy to rinse out.
Wet the stained area with peroxide, scrub to loosen any dried-on spots, then rinse clean.
24. Steam Clean Your Microwave
The inside of your microwave looks like somebody had a food fight . . . a month ago, and you’re dreading all of the scrubbing it’s going to take to get it clean.
Stop working so hard and try this cleaning hack that’ll have your microwave looking and smelling fresh and new in no time.
Zap a half-full bowl of water in A microwave-safe dish for 3-5 minutes. I use my Pyrex measuring cup because it has a handle for easy removal.
Remove the bowl and wipe out the softened mess with a microfiber cloth. If the microwave is stinky, you can add half a lemon to the bowl of water to freshen the smell.
25. Clean Textured Surfaces with a Magic Eraser
Textured surfaces are notoriously difficult to clean. It’s virtually impossible to get into all of those little grooves of the texture with most cleaning products.
Until the Magic Eraser! The one cleaning tool/supply that gets down into the texture to remove that stubborn dirt.
Use it to deep clean your fridge, appliance handles, switchplate covers, and doorknobs to get them clean completely clean.
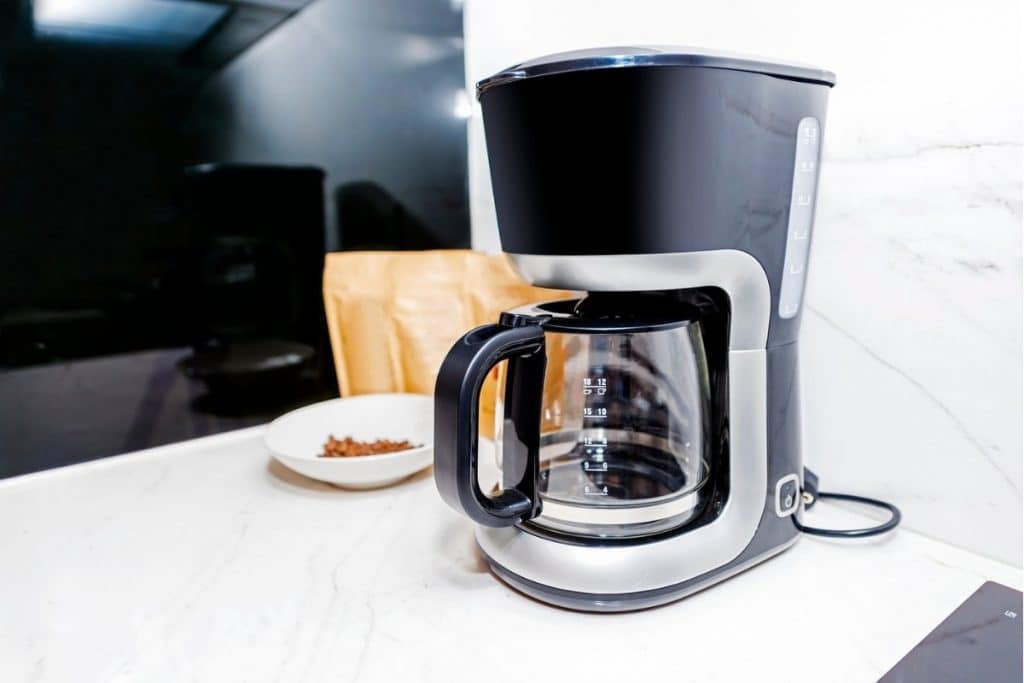
26. Descale Your Coffee Pot for Better Coffee
If your coffee is tasting a little ‘off’, you visibly see scale buildup, or it’s taking longer to brew a pot, it’s time to give it a good cleaning.
Hard water and coffee grounds leave a residue and scale buildup behind. That buildup contains bacteria and collects in the basket and other components of your coffee pot.
Run 1 pot of white vinegar through your coffee pot, then check the basket and drip nozzle for any remaining scale buildup or blockages.
If there is still scale buildup on your drip nozzle, use a toothpick or coffee pot cleaning brush to remove the remaining build-up.
Rinse thoroughly by running 2 pots of plain water through the cycle. If you drink coffee on a daily basis, follow this process to clean your coffee pot every few months.
By the way, you’re welcome for the better-tasting coffee😉
27. Clean Cast Iron with a Potato and Salt
Cast iron should never be washed like traditional pans. The allure of cast iron is the ‘seasoning’, and traditional cleaning methods will strip the seasoning right out of the pan,
Instead, sprinkle 1 tablespoon of kosher salt in the pan, then scrub with the cut side of a potato. Rinse with warm (not hot) water and dry clean with a paper towel.
If you notice dull or flaky areas in your pan, it’s losing its seasoning and will need to be reseasoned.
28. Remove Burnt On Food with a Dryer Sheet
You burned the milk while making Mac & Cheese last night and now you can’t get the scorched mess out of the pan. You soaked it overnight, but it’s just not budging.
Fill the pan with enough hot water to cover the scorched mess, then add a couple of drops of dish soap and a dryer sheet. Let soak overnight, then wipe the mess out and wash like normal,
The softeners in the dryer sheet actually soften the burnt-on mess and make it easy to get out. You might have to use a little elbow grease for really tough spots, but it’s better than throwing the pan away.
29. Use a Bottle Brush and Paper Plate to Clean Your Garbage Disposal
Sure, you can run some ice cubes and lemon rinds through your garbage disposal to freshen it up, but they won’t actually get it clean. By design, the appliance grinds large food particles into smaller pieces that will flow down the drain.
During that grinding, food particles are flying everywhere, hence the rubber splash gasket. Some of those food particles stick to the upper portions of the disposal and the underside of the splash gasket.
Those stuck particles start to rot just like any other food. Grinding ice might dislodge some of it, but not much.
Instead, cut a hole in the middle of a paper plate and slide it over a bottle brush. Dip the bottle brush in a cup of soapy hot water and use the brush to scrub the interior walls of the disposal and the underside of the splash gasket.
The paper plate will keep the soap and rotting food from splashing up on your face.
30. Clean Yourself Out of a Room
Start in the far corner of the room you’re cleaning, and work backward towards the door so you don’t have to walk over your just cleaned areas to get out of the room.
Don’t forget to take all of your cleaning supplies with you as you’re working backward.
31. Whiz Soap and Water to Clean Blender Blades
Blender blades are a pain to clean. It’s virtually impossible to get the underside of the blades without scratching up your hands, but here’s a quick and easy way to get them clean without battle wounds.
When you finish with the blender, rinse it out, then add enough hot water to just cover the blades. Add a couple of drops of dish soap and give it a whiz for 1 minute.
The soapy water will create a blade cleaning vortex. When the minute is up, just hand wash the rest of the blender while avoiding the blades.
GET YOUR CLEANING DONE DURING THE WEEK!
Join thousands of VIPs for cleaning, decluttering, and organizing tips sent straight to your inbox. As a welcome gift, we’ll send you this FREE printable Weekly Cleaning Checklist that lists exactly what to deep clean in every room of your home.
32. Disinfect Your Keyboard with Rubbing Alcohol
Worried about a germy computer keyboard? It’s actually one of the dirtiest things most people forget to clean.
Disinfect it with rubbing alcohol. Spray the keyboard with canned air to remove any loose particles before disinfecting.
Moisten a microfiber cloth with rubbing alcohol, then wipe down the keyboard and let it air dry.
Pro Tip: Never spray cleaners on your electronics. It’s much easier to control the amount of moisture exposure by applying the cleaner to a microfiber cloth.
33. Clean Wood Cutting Boards with Salt and Lemon
A wooden cutting board is a versatile addition to any kitchen collection, but cleaning it the wrong way can ruin it in an instant.
Never soak a wooden cutting board, and never ever put it in the dishwasher. Soaking a wooden cutting board can cause the wood to swell and distort, and the high heat in the dishwasher will likely dry it out and cause it to crack.
The best way to clean a wooden cutting board is to rinse the food off as soon as you’re done using it, sprinkle on a tablespoon of kosher salt, and give it a quick scrub with the cut side of a lemon half.
Rinse the salt and lemon juices off, remove surface moisture with a towel, then let air dry in a vertical position.
Condition the wood periodically to keep it from drying out.
34. Freshen Your Mattress with Baking Soda
You can’t just toss your mattress in the washing machine, so what’s a woman to do?
Even if you have a cover that you launder regularly, your mattress is bound to pick up some odors over time. Neutralize those odors with some baking soda.
Sprinkle half a cup of baking soda over your mattress. Use a fine wire mesh strainer to get the best coverage.
Let the baking soda sit for an hour or so, then vacuum clean. The baking soda absorbs the odors much as it does in the fridge.
After vacuuming, you can spritz lightly with a scented fabric spray but make sure to let it dry thoroughly before placing any linens on the bed.
I do this once every few months while deep cleaning my bedroom.
35. Use Toilet Bowl Cleaner to Whiten Grimy Grout
If your grout is super dirty and you don’t think general mopping is going to get it clean, try some toilet bowl cleaner.
Some cleaners are more effective than others, so I recommend using The Works Toilet Bowl Cleaner for super dirty grout. The Works is fairly runny so you’ll have the most control if you use a fine tip squeeze bottle to apply it directly to the grout line.
Apply toilet cleaner to cover the grout line. Let it sit for 15-30 minutes, then scrub with a stiff grout brush. Wipe the grout with a wet sponge to clean off the dirty toilet cleaner, and let dry.
Once your grout is completely dry and back to its original color, apply a good sealer to protect the grout, and make future cleaning easier.
Caution: Take care to prevent the toilet cleaner from splashing up on appliances and cabinets. The Works Toilet Cleaner is slightly corrosive and will likely damage stainless steel.
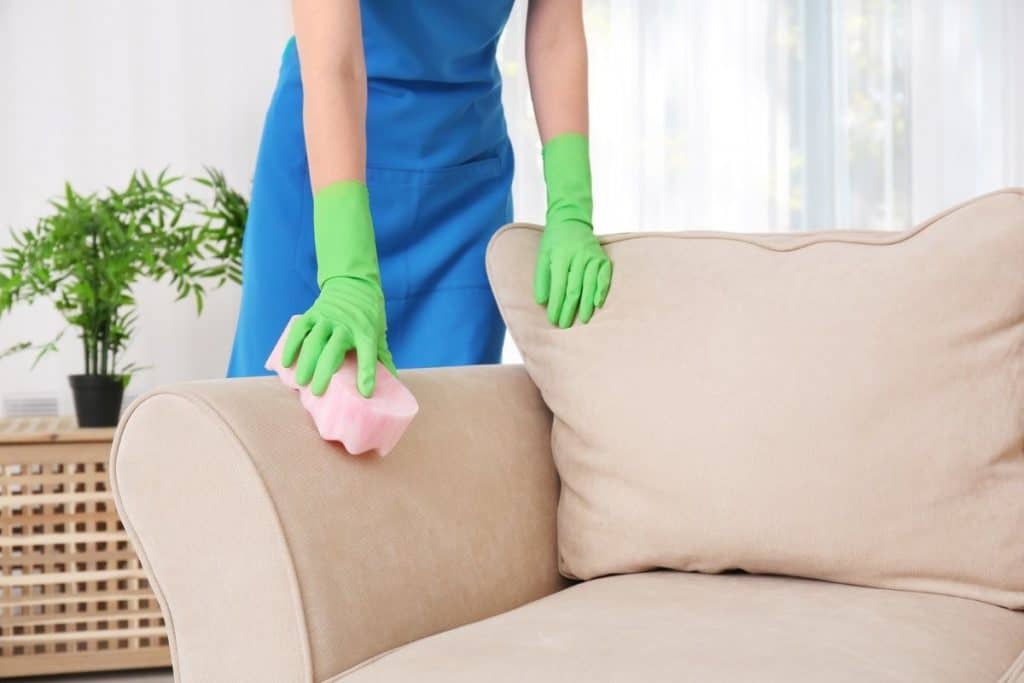
36. Clean Upholstery Spots with Shaving Cream
Are there spots on your upholstery that just don’t come clean with your normal wipe-down? Try some shaving cream.
Cover the spot with shaving cream, let it sit for 1 minute, then scrub gently with a soft-bristled brush.
Remove shaving cream by blotting with a clean, damp microfiber cloth, then let air dry.
The shaving cream is thick enough to stay in place but gentle enough that it won’t damage your upholstery.
37. Air Dry Your Washer Tub to Prevent Mold and Mildew
The washing machine is designed to clean your clothes, but too much remaining moisture in a watertight space will cause stinky mold and mildew.
That nasty mold and mildew will make your freshly washed clothes come out stinky.
To prevent it, leave the washing machine door or lid open between loads so the moisture can dry out.
Pro Tip: Run a ‘bleach’ load periodically to keep the washer extra clean.
38. Strip Laundry to Remove Detergent and Softener Buildup
Detergent and softener can build up on your clothes and linens just like shampoo and conditioner can build up in your hair. It’s a good idea to periodically strip your laundry to remove this buildup.
Fill your bathtub halfway with hot water. Throw in the laundry you want to strip. Add 1/4 cup of washing soda, 1/4 cup of Borax, and 1/2 cup of laundry detergent.
Finish filling the tub with hot water to cover the laundry as needed and give it a quick stir. Let the laundry soak for several hours while stirring occasionally.
When the water has cooled and you’re finished soaking, drain the tub and ring the excess water out of the laundry. Throw the laundry in the washer and run a rinse cycle, tumble dry, and enjoy!
39. Increase Showerhead Water Pressure
If your shower head seems to be losing pressure, chances are the spray nozzles are clogged with hard water deposits.
Fill a plastic baggie with vinegar and wrap it around the showerhead. Secure it to the showerhead with tape or a binder clip and let it soak for a few hours.
Remove the bag and scrub the spray nozzles with a stiff grout or nail brush, then rinse clean. If there are any stubborn deposits still hanging on, clean them out with a toothpick or push pin.
I do this at least once a year when deep cleaning my bathroom.
Caution: Wear safety glasses to prevent the vinegar from splashing in your eyes, or remove the shower head and clean it in the sink.
40. Use Vodka to Remove Fabric Odors
Fabrics absorb and retain odor-causing bacteria from contact with our bodies. That bacteria can get trapped in the fabric fibers and remain even after washing.
The high alcohol content in Vodka makes it the perfect bacteria-fighting disinfectant and is great for killing germs on fabrics when somebody’s been sick.
Just spray stinky fabrics and let them air dry. The Vodka will kill the bacteria and neutralize the odor as it evaporates.
Plus, you can pour yourself a glass while filling the spray bottle.
Rubbing alcohol will do the same thing, but I wouldn’t suggest saving any for a nightcap!
41. Use Microfiber for Dusting
Feather and synthetic dusting wands are cute and handy, but they don’t actually remove dust. They just move it around to a different surface.
Do yourself a favor, don’t make that cleaning mistake. Get some good microfiber cloths or dusting wands. The microfiber has tiny little loops that pick up and trap dust, and the microfiber doesn’t leave any lint behind.
When you’re finished, just toss the cloth in the laundry so it’s ready for the next use.
I don’t know what I did before microfiber. I use them for everything, including cleaning my furniture, wiping down my counters, and cleaning anything glass.
Pro Tip: Never use fabric softener or wash microfiber with other towels. The microfiber will pick up the lint from the other towels, and the fabric softener will make it repel moisture – which doesn’t help when you’re using cleaning solutions.
Cleaning Tips to Make Housekeeping Easy
If you’re still wanting more after reading these tips, tricks, and hacks for making housekeeping quicker and easier, check out the 10 of our most popular cleaning articles.
What cleaning tips and hacks help you keep your home clean?


3 solutions to eliminate the bad smell of your sandals
Mint tea bags
Do you usually drink infusions of tea, pennyroyal or similar? You should know that if you let the used bags dry, you will have at your fingertips a simple and inexpensive natural environment deodorant. These bags can be used for the fridge, closets, the car or … your sandals.
When you have had your tea, let the tea bag dry.
We recommend that, to enhance a pleasant aroma, you impregnate them with a few drops of peppermint essential oil. As they lose their odor, you can add more to them.
Thanks for the tips Irshad!
I LOVE a clean house thats why i always search for amazing cleaning tips today I just land on your page I read your 41 tips all the tips are amazing it seems my searches end here because all these tips are very useful for me. thank you very much.
My pleasure Jackson! Happy they help.
These tips are amazing!! I had no idea about some of these, especially cleaning grout with toilet bowl cleaner. I’m trying that this week because I hate cleaning the grout.
Happy to help Michelle. Getting that dirty grout clean is so satisfying!